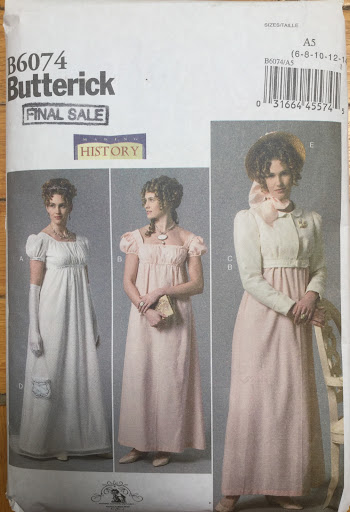
 So there are a lot of really costume-y non historically-accurate early 19th century style patterns out there, especially from the Big 3 lines, or whatever the costumer nickname for them is. To be honest though, not all of them should be immediately written off, and some are much better than others... and I'm especially inclined to modify and work with something that is halfway there if I can literally just pop over to the store and get it on sale for $5. Butterick 6074 has interested me since it came out a couple of years ago, and I finally had occasion to buy a copy last month. It's a little bit of a mixed bag, but there were certain details of cut that seemed inspiring: observe the straight back seams on all three garments- these tend to be rather common in extant Regency garments, instead of the usual princess-seam backs you find on a lot of costume-Regency patterns from the Butterick/McCalls group. The spencer also looks like it has a decent cut, with the shoulder seams placed on the back. It's a broader sort of back, and the sleeves probably should be placed a bit farther back for a more historical- looking cut, but I think in general the pattern could work decently for Regency. It comes with the same quirks as many historical patterns from the big companies- loads of ease, and cut for a figure without
stays- as well as the classic armscye-sleevecap problems in the sleeved garment sections. However, with
some prudent measuring, good fitting, and basic pattern alteration
skills, I think these can easily be overcome.
So there are a lot of really costume-y non historically-accurate early 19th century style patterns out there, especially from the Big 3 lines, or whatever the costumer nickname for them is. To be honest though, not all of them should be immediately written off, and some are much better than others... and I'm especially inclined to modify and work with something that is halfway there if I can literally just pop over to the store and get it on sale for $5. Butterick 6074 has interested me since it came out a couple of years ago, and I finally had occasion to buy a copy last month. It's a little bit of a mixed bag, but there were certain details of cut that seemed inspiring: observe the straight back seams on all three garments- these tend to be rather common in extant Regency garments, instead of the usual princess-seam backs you find on a lot of costume-Regency patterns from the Butterick/McCalls group. The spencer also looks like it has a decent cut, with the shoulder seams placed on the back. It's a broader sort of back, and the sleeves probably should be placed a bit farther back for a more historical- looking cut, but I think in general the pattern could work decently for Regency. It comes with the same quirks as many historical patterns from the big companies- loads of ease, and cut for a figure without
stays- as well as the classic armscye-sleevecap problems in the sleeved garment sections. However, with
some prudent measuring, good fitting, and basic pattern alteration
skills, I think these can easily be overcome. | ||
| Those back seams. So nice. Also I drew in the sb seams in black on view B, so you get an idea of what we're gonna do with it! Image source: https://butterick.mccall.com/b6074 |
In looking at this pattern, the first thing to note is that it contains overlay pieces and lining pieces for each gown. This means that if you follow the instructions, you are creating a fully-lined garment- the lining of which essentially does the job of the petticoat. Thus, in order to make only the petticoat, we need to collect all the lining pieces of the bodice- we will need pieces 5, 6, 7, 8, 12 and 13.

Now you will realise that the shoulder strap comes in two pieces... and it's called a "yoke" in the pattern description. Bizarre. Why divide into a two-piece yoke what should evidently be a single-piece strap? It is much easier and slightly more attractive to make it a single shoulder strap- so let's turn it into one. To make this a shoulder strap, draw a line 3/4" in from the edge of pieces 12 and 13 where they should be attached. Match them up so that these lines are sitting on top of each other. *explanation: you do this because the original pattern drafter has added the standard seam allowance on all sides of each pattern piece, with the intention that you will sew the two pieces together. Given that we’re only going to cut this in one piece though, and not two, this means that if you put the pieces together end to end as they are, you would end up with a strap that is 1.5" longer than it's supposed to be.*
 |
| Pattern pieces 12 and 13 attached to form the strap. |
Lay your pattern pieces (including your newly-altered
*I have not mentioned the skirt pattern at all because technically we don't need a pattern for this- and the pattern shape in this envelope is mostly a rectangle anyway, and not very flattering given the way they've gathered it on the envelope. You could use the pattern they give you and just adjust the gathers in whatever way you feel suits you best (concentrating your fullest pleats or gauging at the back is always a good option). Alternately, you can just measure out however many widths of fabric work best for you, or cut a gored skirt, with a slightly a-line panel inserted in the sides, and a rectangle in back. The latter is more work and less alterable, obviously, but it is also a very pretty shape. From what I understand (though I haven't gotten to personally study any originals yet) early 19th century skirts are actually fairly big- many hems appear to measure from around 85" to 100"!*
I'll be following up in another post about how I constructed my petticoat with the resulting pattern pieces!
NOTE: I am not in any way paid or otherwise remunerated to promote Butterick's patterns- I just thought this would be a useful guide using a pattern which is easily accessible to many people, and I hope it's helpful!