Pages

Friday 16 December 2016

1790s habit waistcoat (HSM #11)

I was originally going to post this project for the Historical Sew Monthly "Pattern" challenge. It's been long enough though now that I figure I might as well post this under the Red challenge (it has some red in it). When I found the fabric I made this up with, it made me think of some of the roller-printed cottons from the turn of the 19th century. There is actually a small leaf scrolling pattern in between the stripes, which may or may not be very evident in the photos here.


Challenge: Red. I was originally going for the Pattern challenge, but that was a fairly long time ago now.

Material: 1/2 metre striped quilting cotton, about 1/2 metre beige drapery cotton, and some canvas for the fronts, lapels and collar.
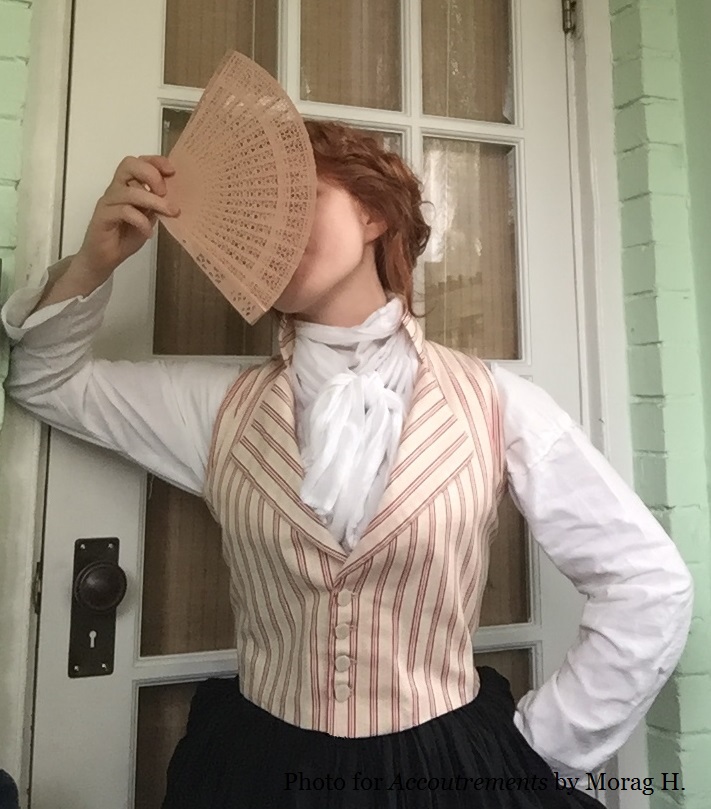
Pattern: Adapted from plate XIX of The Cut of Men's Clothes, by Norah Waugh (and altered to fit over stays- I cut down the back, took in the waist, shortened the body a lot, and made the lapels slightly smaller). I used the descriptions of contemporary waistcoat construction in Costume Close Up (by Linda Baumgarten).

Period: 1790s.


Notions: Cotton thread, metal washers (bases for the buttons), wax, thin cotton tape.
I'm so happy with this stripe match!

How historically accurate is it?: Maybe 80%. I sewed it entirely by hand. It's completely made of cotton (although cotton thread still wasn't really a thing in this period, so points down for that). To be honest, I don't know that much about how accurate the weight of the striped fabric was for this (it's really thin).

I cut it down from a men's pattern, and the fit works for now, but next time I think I would cut a deeper curve on the front (Lesson learned: don't sew with striped fabric when trying a pattern for the first time!), I would also cut back the armscye some more (I had already cut it fairly substantially back from the original pattern.

*****

I took inspiration for the cut of my waistcoat from these gorgeous examples at the V&A museum:
I love the collar and lapels on the red waistcoat (besides its striking colour), and I thought the embroidery pattern on the striped one was very pretty.

  Left: Wool, 1790-95; Right: Linen with silver-gilt embroidery, 1790s

I didn't end up making it double breasted though, because I was so fed-up with buttonholes after sewing the first line of them!
I also changed the back from a lacing back, like these two examples have, to a back closed with ties (see above). Ties appear to also have been a period way of closing the back, though I don't know how common they were on women's waistcoats (as opposed to men's).

Hours to complete:
It took far longer than I had intended. I fully started this in the middle of the summer. It was all good though, because I learned lots of important things while making this piece.

First worn: For pictures.

Total cost: 0.5 metres striped fabric- $3
0.5 metres beige cotton- $1.50
0.25 yard canvas- $1.5
4 washers-15¢
some silk thread which I used on the buttonholes before realising that not all silk thread is appropriate as buttonhole twist- $4
= $10.15
All my other notions I already had.


A sample of materials and tools I used to make this. Ok, I didn't end up using the hammer- that was just there by coincidence- but all the rest I used! My table was unusually organised when I took this photo. Sadly enough, the table has since descended into pandemonium...


Friday 26 August 2016

A new summer dress

Well, summer is starting to wrap up, but I figured I might as well post a summer dress I finished earlier in the season.


A couple of years ago, I started working on the Butterick reprint pattern 6055. After making it up though, I abandoned it because the fit was pretty weird (I think it didn't help that I accidentally cut it a size too big). After some intensive re-cutting, I ended up removing more than an inch of material from the shoulder seam on either side, and it looks a lot better now. The fit still isn't perfect. Lopping all that off the top of the dress made most of the bodice fit better, but has caused some strange little wrinkles along the collar line... Thankfully the fabric print seems loud enough to distract from it!


Another thing with this dress which I didn't know at first is that it looks best with a belt (especially if the fabric is really busy like mine). There is a belt pattern included in the envelope, but I drafted this one on my own and it's a bit different from the pattern that came with it. It's made from some leftover black fabric from my other reprint dress, and a black plastic buckle from the local fabric store. The belt's base is made from several strips of canvas and burlap base that I used instead of belting.


Some black accents at the neck are a cute addition!

Thursday 30 June 2016

Red chemise gown updates

I wrote earlier this year about my plans to make a red chemise gown- here is some of my progress on it!

The front is made up of two really long panels of fabric- I then put drawstrings on them at the neck and waist, and sewed them together from hem to waist. The cut of the back and shoulder straps (still yet to be covered) are from a basic late 18th century style bodice sloper that I drafted off my stays a while back. For the bodice construction on the back portions of the gown, I followed Serena Dyer's tutorial on 18th century gown construction, and stitched the fashion fabric onto my already-constructed bodice lining (not only is it historically accurate, but it's actually really nice and easy too).


Inside view of the front panel.
The lining of the gown (along with under-bodice front).

To give it some more structure (and a bit more modesty, given that the front only closes with two ties!) I added an under-bodice in the same material as the lining (a medium-ish weight linen-cotton blend).
I'll try to get some more photos up soon-ish of how it fits!

Thursday 12 May 2016

Stuff in the sewing room


B6055- the flowery one pictured left,
with another dress I'm still altering.
Recently, I finished altering a dress that I had started ages ago from a reprint 1950's pattern (Butterick 6055, the red floral print dress pictured on the left in the photo). It turned out really awful-looking the first time I made it up, (and I think I accidentally cut the wrong size) so I had to take it in by a lot. Maybe I'll actually have the opportunity to wear it now that the weather's nice!
 

 I've also started taking a pattern drafting course at a school nearby (which is going really well!). We've been drafting jacket blocks, and the course has helped me improve my fitting techniques a lot!

*****

On the historical side, I've been working on the red chemise gown since I last posted about it in February. I've completed the body of the dress. I'm still in the mock-up stage of the sleeves because they're giving me a hard time, but that's most of what I have left! I'll also try to post more about the construction and how it went when I'm done, but I'm very pleased with it so far!


The front, showing the under-bodice beneath.
The back- I am very proud of all those pleats!

Wednesday 17 February 2016

19th century blue gown: HSM Challenge #2


I originally made this gown to wear when I volunteered as a docent at a small museum. I never fully finished some of the details on the gown (particularly those sleeves) and it has sat as a sad UFO in my closet for over a year now. Sit no longer, gown! Your time has come!


Challenge: Pleats and tucks. The tucks are on the bottom of the skirt, and the pleats at the top! I admit, this is far from the most creative way of incorporating either into a garment, but hey, it's got both, so why not?

Material: An old cotton duvet cover, cord for piping, hooks and bars, cotton thread, and some scrap canvas and other white cotton from my stash (I think this also started life as an item of bed-clothing... maybe I've got a pattern here).

Pattern: S&S Romantic Era Day Dress (with modifications)

Period: mid to late 19th century

How historically accurate is it?
The museum I volunteered at was originally a toll-keeper's cottage. It was located on the outskirts of the city of Toronto, on one of the many toll roads that led into the city. The cottage served as a home the toll-keepers and their families from the 1830's to the late 1890's.There isn't much information available on clothing worn by rural workers living on the outskirts of 1860's Toronto (in Upper Canada), and I'm still not sure if this is an accurate representation of something of the sort (maybe the info's out there somewhere, but if it is, I couldn't find it- if anyone could point me to anything, I'd be very grateful!).

As far as construction goes, it's reasonably accurate- I'd give it maybe an 75 % given that the the 19th century isn't really my strong suit (ha puns!) historical sewing-wise. It was an entirely new era for me. I sewed it entirely by hand, I fudged some inside details, like lining the inside of the bodice with the same blue fabric as the outside. I also didn't hang the skirt from the bodice (which would be probably more accurate), but enclosed it in the waistband instead. The sleeves aren't actually the classic 1860's two-piece sleeves- I drew the single pattern shape here and had to reset and piece it a million times to make it work. All I can say is that at least they actually fit me now!

Hours to complete: About three days straight of sewing over a year ago!! Plus a few hours this month to finally finish up the sleeves.

First worn complete: Yesterday while doing finishing touches, to see if it fits. I last wore it in its incomplete form on Canada day (July 1st) last year while doing a shift at the museum's promotional table in a local festival.

Total cost: For the materials, about $3.75- this was for the half a pack of skirt hooks and the piping cord. Everything else I had around already.

Friday 29 January 2016

Red chemise gown: Inspirations

On a crisp day in early fall, I was wandering through my local Fabricland when I happened upon the most wonderful bolt of red cotton voile in the bargain discount room. While red was a very unsuitable colour for any kind of chemise/shift undergarment sort of thing, it was still the perfect weight for something else: that perfectly scandalous upscaled outer-garment cousin to the chemise, the Chemise Gown!

*****

More specifically, the idea of metres upon metres of red voile made me think of a pretty red 1791 gown featured in Hansen's Costume Cavalcade (which I swear was one of my favourite books when I was a kid). Some wonderful costumers on the 18th Century Sewing facebook page directed me to the original after which the illustration in the book was based. Here it is, the original fashion plate:

Journal de la Mode et du Go(u)t, 25 décembre, 1791-13ème cahier,
 in the collection of the Rijksmuseum.
 Displayed in glorious detail here, on their website.

The original source1 description of the gown:
"The coiffures en cheveux [hairstyles without a hat or pouf], having been for some time neglected, have returned more stylish than ever. Here is one in the new taste. It is formed all in large curls, and is trimmed with a garland of poppies. Gold earrings, totally round. Necklace made of a nakara [a shade of red] ribbon.

Kerchief of gauze or linen batiste, as you like, all plain.

Chemise gown, a la Coblentz, of nakara satin, trimmed along the bottom and on the amadis sleeves with black satin. We observe again, in passing, that the color of the gown is very striking in fabric, and one must not judge it by the illustration which necessarily renders it dead.

White gloves. Nakara shoes trimmed with black satin."
(Translation by Cassidy Percoco)

*****

My cotton voile will obviously have to stand in for satin, which I don't have. I'll be writing updates on the progress made on this dress in later posts!


1 18th Century Sewing group also alerted me to the fact that you can also access the full magazine it came from (with the original French text) digitally, through Gallica BNF- the full magazine makes an interesting read too- there are book/theatre reviews, small anecdotes and even sheet music in some of these editions!

Monday 11 January 2016

A Châtelaine: HSM Challenge #1

 Challenge: Procrastination. I started this in the summer- and I finished it only about a week ago (ok, I guess not so bad, but still...).

Material: Metal (mostly brass with some gold-covered parts, I think)- more specifically, two old buttons, chain, some wire and some small metal bits for attaching pieces of jewellery to one another.

Period: Late 18th century/early 19th century

How historically accurate is it? I made it mostly to look good. While the design is inspired by one that I saw in a museum (see below), it's not particularly historically accurate. I used jewellery bits I already had, or could easily buy at the nearest beading store, and I have no actual metallurgy skills (that belt hook in the inspiration piece, pictured below, would certainly take metal forging skills, not to mention everything else). The accessories I have hanging on it aren't particularly historically accurate either, but are my very modern approximations of accessories someone could hang on one of these.

Hours to complete: About 4 or less for the actual assembly of the piece (figuring it out and trying to find parts was much longer, hence the procrastination)

First worn: January 10th, at Montgomery's Inn for the Twelfth Night Ball. Just saying though, these things are awesome (and convenient if you haven't got pockets) but are a heck to position right so they don't tangle as you walk!

Total cost: about $7 (Can.)

*****

The inspiration for this piece came from a wonderful little section in the European design gallery at the ROM which focussed on 18th century ladies' accessories. Although I don't have a photo of the entire set-up they had, I was able to take a photo of the châtelaine itself:
18th century châtelaine, in the collection of the Royal Ontario Museum.

Unfortunately I don't think there are actually any good photos online of this artefact,
 and this was the best pic I could get with my camera

I decided to copy the general shape of this one (as well as the metal tongue- mine's just basically some twisted wire, but that part goes under the waistband and no one sees it, so it's ok). I also found the metal tassels a really cute detail. This detail appears on other châtelaines as well, like this gorgeous one in the Museum of London:
Gold Châtelaine, 18th century. Museum of London.
Picture source: http://www.museumoflondonprints.com/image/141871/tawney-gold-chatelaine-and-case-watch-18th-century